First get Visual Studio 2012 opened. Hope you have successfully installed both Visual Studio 2012 and WPSDK on your machines. So lets start working now. To open a Windows Phone App file, go to
File -> New-> Project
Then you will get a screen like follows.
 | |||
| New Project screen |
Select Windows Phone in Templates, (where I have marked as number 1), then select Windows Phone App (number 2). Give a proper name (number 3) and hit OK button. (marked as number 4)
If you get a screen like follows, make sure you select 'Windows Phone OS 7.1' from the drop down list before hitting OK button.
 | |
| OS Version |
Now you have opened a new Windows Phone App file. Lets see what kind of files we are going to work with when we are developing a Windows Phone App first. If you take a look at the Solution Explorer, you will see that there are 3 png files and 2 xaml files.
 | |
| Solution Explorer |
Let me tell you about the jpg files first.
ApplicationIcon - as the name implies it, it's going to be the Icon of our app.
Background - You all know what this is. It's the background file of the MainPage.
SplashScreenImage - it's the image which will appear for a very short time before the app actually starts running.
(I will attach screen shots of a running app, for each of these png files , so you can understand where they fit in)
MainPage.xaml is the file we are going to work with now. And the MainPage.xaml.cs file inside it holds the code of the MainPage.xaml file.
We can use both of these files to edit our phone app page.
Lets create a simple app first..
Edit the PageTitle (number 2) and the ApplicationTitle (number 1) as you like. To do this you can either double click on the text block in MainPage.xaml file or edit Text under the TextBlock tags in MainPage.xaml.cs file.
 | |
| MainPage.xaml |
 | |
| MainPage.xaml.cs |
I changed the PageTitle to "Hello" and kept ApplicationTitle as it is.
Now we are going to add a Application Icon, Background and a Splash Screen Image to the app. To upload new files, right click on the project name under Solution Explorer. Then select
Add -> Exsisting item.
 | |
| Add exsiting item |
Then you will get a file browser. There select the files you want and click Add button. Now you can see your images in the solution explorer. Delete the older jpg files and name the new ones to be exactly the same as the older ones. So again you will end up with 3 jpg files named
ApplicationIcon.jpg
SplashScreenImage.jpg
Background.jpg
Now we have finished creating the app. Now click on Emulator WVGA 512MB button right bellow the meu bar.
These are the screen shots I promised earlier..
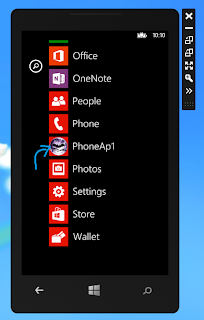
Application Icon
 | |
| Application Icon |
Splash Screen
 | |
| Splash Screen |
Your first Windows Mobile App sample is done now. Next time, I will tell you how to add an animation to your page. Till then, Take Care...


0 comments:
Post a Comment