Hi guys,
Last time I described how to create a VM on Azure cloud. This article is a continuation of it.
As the outcome of last article we have a brand new VM on our hand waiting to be configured. So lets do it.
I hope you have a little understanding on web servers, server side scripting. Because today our main focus is to install Apache, PHP and MySql on our VM.
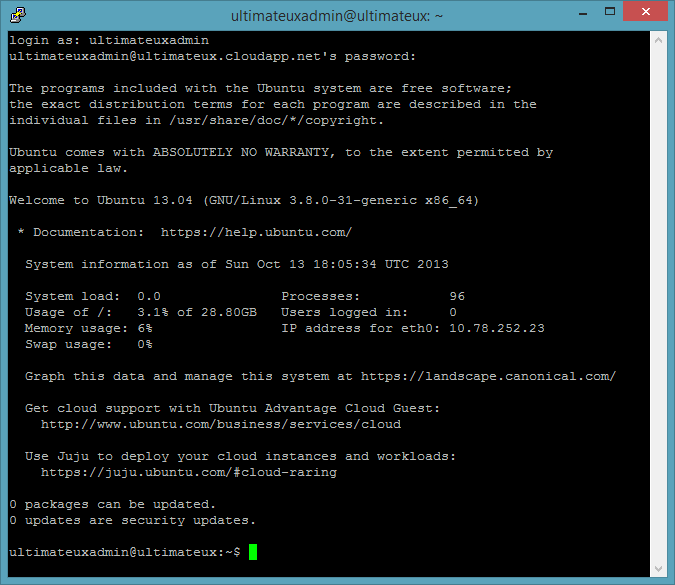
Lets log in to our VM via ssh to handle the installation of above described software.
Assuming you logged in, Lets install Apache web server first.Type the following code and press enter.
sudo apt-get install apache2
After the confirmation, web server will install. Since our web server is finished installing lets try to access it via browser. Type your DNS name on the browser and press enter. You will end up with a similar error message to following.
Now you might be wondering because we just finished installing the web server and still we cant access it via the browser. Yeah it is true that we just installed the web server. But still we did not add a ENDPOINT. By adding a end point we can provide a method of accessing our VM. So far we have create one end point for SSH. Lets go and create another one for http.
Go to azure management portal and go to your VM.
Under Endpoints, click Add
Click "Add standalone Endpoint" and press next.
Under the details, set following values;
Name : HTTP
Protocol : TCP
Public Port : 80
Private Port : 80
(Due to security reasons you can change the port values. But make sure to update the "httpd.conf" of Apache with the relevant values.
Click on complete and within seconds changes will be applied. Lets try to access our server again via browser. You will see something like this.
That is a green light. It means installing Apache and configuring an endpoint was successful.
Now lets see how to install PHP on the VM. Type the following command on terminal and press enter.
sudo apt-get install php5 libapache2-mod-php5
This will install php5 first and then the php5 module for apache web server secondly. If you do not install the module, you will not be able to parse php snippets in Apache server.
After everything finish we need to restart the Apache server. enter following code
sudo /etc/init.d/apache2 restart
While restarting the apache server, if you see a warning as “Could not reliably determine the server’s fully qualified domain name, using 127.0.1.1 for ServerName”, then you can fix this by creating a file with the Server name. To do this type the following command in the terminal:
sudo nano /etc/apache2/conf.d/fqdn
When the text editor opens, type “ServerName localhost” inside the file and click Save. Then close it. Now restart again with the above code and you will see that the warning message has gone.
To check the php installation lets create a test php file. Enter following command and press enter
sudo nano /var/www/testux.php
enter following code in it and save and exit.
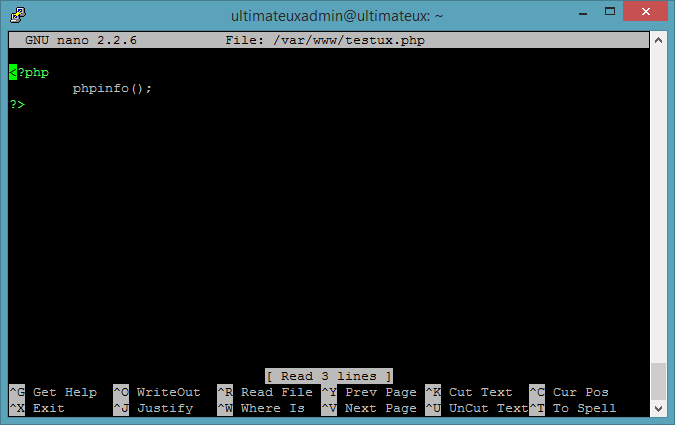
If a page like following loaded, it means you have successfully installed php.
Article is getting little bit long and will become boring to read. So for this part I'll stop it from here. From the next article I will show you how to install Mysql, phpmyadmin and moving your php app to VM.
See ya.
Monday, October 21, 2013
Sunday, October 13, 2013
How to create a Virtual Machine in Azure
Today I am going to explain you about how to create a Virtual Machine(VM) using Windows Azure. Most of you might heard what is a virtual machine or a virtual pc. Lot of guys use it to try out new OS, to try out new software, or to hack some apps and so on. If you are not aware of VMs you can get a better understanding about VM by viewing this video .
So I guess now you know what VM is and what am I gonna do is to explain how you create a VM using Azure.(Later I am going to attach some articles related to Remote Desktop to VM + hosting a PHP site on your VM)
1. Log in to your Azure management portal
2.Click New
3. Select Compute-> Virtual Machine -> From Gallery
4. Select the Operating System which you would like to install on the VM. In this scenario we will install Ubuntu server 13.04 because then it will be easy for me to continue with the later posts on creating a PHP app on our new VM.
5. Next window will ask you about user details, VM RAM and number of cores, and a name for VM. Fill them as you wish. I will use a password instead of a ssh key.
6. This window ask you about cloud configuration (DNS Setting) and Storage account and Region. Except for region leave the rest as it is unless you know what you are doing.
7. Now we will have to create end points for us to access the VM. For now lets keep SSH access only. Later post, I'll explain about remote desktop
8. Then the VM will be created and will be running after few minutes. You can see it in your azure portal
Congratulations!!!. Now you own a VM at Azure cloud. But you might be wondering how to use it. Don't worry. You can log in to your VM via SSH. We will use "Putty" to connect to the VM.
9. Open putty and provide DNS name as Host name and public PORT of Azure VM as Port. Then connect to the VM by pressing Open button. During the process you will be prompted to enter your security credentials. Enter them and you will be log in to the server.
As you can see now you are logged into the newly created VM.
So that's it for today. I will write you soon about how to remote desktop to a ubuntu VM using Azure
Thank you
Monday, September 16, 2013
Recently published WP and Windows Store apps of mine.
Hi guys,
With my MSDN I got access to few dev centers and I recently published few apps on both Windows Store as well as Windows Phone Store. Some of them are basic stuff but you might find them bit useful. Feel free to try those. And rate them if you can :)
And few of my Windows store apps were picked as Top rated apps and were awarded as "Editors pick" award as well as "100% clean" award by "BestWindows8Apps.com".
You can find out more on those award winning software on following links.
You can find my apps on Windows Phone and Windows Store on following links.
http://bestwindows8apps.net/lagna/ http://bestwindows8apps.net/star-of-soccer/ http://bestwindows8apps.net/moovie-finder/ http://bestwindows8apps.net/tutorial-center/ http://bestwindows8apps.net/pass-crypto/
You can find my apps on Windows Phone and Windows Store on following links.
Windows Phone Apps
- Awsome Puppy : http://www.windowsphone.com/s?appid=eb8a8794-93f3-4c54-bc27-90e4364dcb78
- Cookies Delight : http://www.windowsphone.com/s?appid=b4da1809-7756-4323-b16e-1c875bd26119
- Districs Of Sri Lanka : http://www.windowsphone.com/s?appid=0d952db4-c513-4c96-84b2-00fa00a8707b
- Endemic Birds of Sri Lanka : http://www.windowsphone.com/en-us/store/app/endemic-birds-of-sri-lanka/2b7bd4b6-d5f7-4096-930f-9a531e28fe7e
- Feared Spiders : http://www.windowsphone.com/en-us/store/app/feared-spiders/0f35fe94-c0a2-4b09-ab7f-5203ba0ec7da
- Halloween : http://www.windowsphone.com/s?appid=b26466f3-00ca-4fa5-b0b6-e29da80f953e
- La Liga News : http://www.windowsphone.com/en-us/store/app/la-liga-news/8ee7a462-39a9-4d61-bb2e-4961ddd0ede1
- Most venemous snakes in Sri Lanka : http://www.windowsphone.com/en-us/store/app/most-venemous-snakes-in-sri-lanka/a0879f9f-910f-463c-93e9-2ad6dc796476
Windows Store Apps
- Top 10 Resturants in Colombo : http://apps.microsoft.com/windows/en-us/app/top-10-resturants-in-colombo/c7f3d3c4-64ae-4212-bcb1-0354a9909830
- Star of Soccer : http://apps.microsoft.com/windows/en-us/app/star-of-soccer/2fd64ba2-8676-4998-a015-8deeb98e81de
- Moovie Finder : http://apps.microsoft.com/windows/en-us/app/moovie-finder/4ab73f03-3b22-4754-9d45-a53156ebe290
- Tutorial Center : http://apps.microsoft.com/windows/en-us/app/tutorial-center/29480720-513a-4175-8a92-8205d3c6d3e8
- Pass Crypto : http://apps.microsoft.com/windows/en-us/app/pass-crypto/8ab69de4-340b-4359-9fc3-e588e947e888
- NIC Analyser : http://apps.microsoft.com/windows/si-lk/app/nic-analyser/5c82026b-79df-4827-9873-4877ce1e9c8c
- Passgeni : http://apps.microsoft.com/windows/en-us/app/passgeni/1490de29-40be-47b3-9049-26b695f9a519
- Programming Legends : http://apps.microsoft.com/windows/en-us/app/programming-legends/01e3f22f-232b-4062-b30c-5de1aa3cadce
Sunday, September 15, 2013
Single Page Applications With Visual Studio
Hi Guys,
While I was going through my G+ page I found a link to a video. Actually it was one of my presentation at Microsoft Student Champs - Sri Lanka. In this video I am giving a simple introduction to S.P.A. Feel free to watch and comment. :)
(ah. I am the one who is in first half :P )
While I was going through my G+ page I found a link to a video. Actually it was one of my presentation at Microsoft Student Champs - Sri Lanka. In this video I am giving a simple introduction to S.P.A. Feel free to watch and comment. :)
(ah. I am the one who is in first half :P )
Sunday, September 8, 2013
Windows App Certification Kit 2.2 Fails on Windows 8.1? Here is the solution
Hi guys,
These days I am working with windows store apps. It is a cool platform with some creative stuff. But some people hate it, don't know why. After finish developing some apps, I wanted to publish them on the store. Before submit to the store, there is a tool to check your app for some issues. That tool is "Windows App Certification Kit" So far I was aware of the latest version 2.2 which ran smoothly on my windows 8 few weeks back. Recently I changed to Windows 8.1 and installed usual software set including Visual Studio Ultimate 2012 (Update 3) and many more development tools. And when I lunch WACK when creating app package, it gave me following error
Then I launched the app certification kit separately so that I could select the app and check, And below image the result I got as the list of installed apps.
Pretty Creepy right?
Well the problem is this. Windows App Certification Kit 2.x Is not compatible with windows 8.1.
You will have to install windows app certification kit 3.0 to fix the error.
You can find the WACK 3.0 here.
After installing WACK 3.0 Everything went back to normal. Hope this helps for you.
Later guys.
This post is related with the question I made at StackOverflow.
PS : When I checked for updates for W.A.C.K. it said that it's on its latest version. But the site had 3.0 released.
These days I am working with windows store apps. It is a cool platform with some creative stuff. But some people hate it, don't know why. After finish developing some apps, I wanted to publish them on the store. Before submit to the store, there is a tool to check your app for some issues. That tool is "Windows App Certification Kit" So far I was aware of the latest version 2.2 which ran smoothly on my windows 8 few weeks back. Recently I changed to Windows 8.1 and installed usual software set including Visual Studio Ultimate 2012 (Update 3) and many more development tools. And when I lunch WACK when creating app package, it gave me following error
"The Windows App Certification Kit experienced the
following failure while validating your app
The {0} cannot continue testing since the specified
Windows Store App was not found. Please verify that
the packagefulname is correct."
Then I launched the app certification kit separately so that I could select the app and check, And below image the result I got as the list of installed apps.
Pretty Creepy right?
Well the problem is this. Windows App Certification Kit 2.x Is not compatible with windows 8.1.
You will have to install windows app certification kit 3.0 to fix the error.
You can find the WACK 3.0 here.
After installing WACK 3.0 Everything went back to normal. Hope this helps for you.
Later guys.
This post is related with the question I made at StackOverflow.
PS : When I checked for updates for W.A.C.K. it said that it's on its latest version. But the site had 3.0 released.
Wednesday, August 21, 2013
Trying dot net? MVA is the place to start
Hi guys,
Out of thousands of programming languages, C# is one of the top ranked programming language. Not only C# but lot of technologies from Microsoft is rocking these days. Sharepoint, TFS, ALM and many more. These days Windows 8 Metro apps also a new trend. With the launch of windows 8.1(still under customer preview) it spreed like fire. Seriously I am beginning to love those areas. Combination out of the listed technologies can do many more things. So you also try that out.
What I am gonna give you today is a site, from Microsoft where you will find so many courses(Video). I tried this site and all day long I was watching videos of that site. Those are pretty amazing. The way of teaching is superb. From the beginning to very advanced topics has been covered. So you also get started today.
Microsoft Virtual Academy.
Tuesday, August 20, 2013
BIOS Update on Dell Inspiron n5110
So far what I had in my mind about BIOS update was "STAY AWAY WITHOUT RUINING YOUR PC" because it was a bit difficult process(few years back it was done using only the command line). If you do even a simple mistake it might cause you to throw away your mother board. So I didn't even look at it.
But today when I was trying to install Windows 8.1 on my n5110 laptop it said "Windows 8.1 cannot install on your pc. Please update BIOS". So I had no option but to update BIOS.
By default, n5110 comes with A09 BIOS version. And the updated version A11 is available for this laptop.
In order to flash BIOS you need to have the binary file (exe file) provided by Dell inc. To obtain that file go to this link .
Then select "Start Here" under "Support for Home"
Then you will have to provide your service tag.
After that you will have to select Drivers & Downloads from the below screen. And under Operating system, make sure to select BIOS.
Then it will show the updates available, select the latest and download.
Now the scariest part. All you have to do is double click on the downloaded file and click next. Everything will be done automatically. Easy right??? Well I was so afraid to update BIOS, but I just got realized that with the time, even BIOS update got easier. And don't forget to plug your laptop into a power outlet as any power interruptions may cause DEATH to your laptop..
I hope you got everything. I'll try to capture a Screen-cast if I got a chance with one of my friends laptop. But till that, please bear with the post...
Monday, July 29, 2013
Solution for Slow download speed of MSDN
Hi guys.
Last month I got a MSDN account and I was trying things. But when I try to download a software from MSDN, it was hilariously slow. I thought may be it was my internet connection as at home I got a poor 512kbps (Not 512KBps) line. Then I tried downloading the same software at university which had over 3MBps line but the result was the same. I never got more than 60KBps. And the worst part was sometimes the download got corrupted after downloading 60% - 80% of the file which made me really angry.
May be most out of you guys must have experienced it. So I dig a little and on MSDN forums I found a solution. It was "Microsoft File Transfer Manager". You can find more information about it here.
I download it. Installed it. and again got confused. How do I use it?...
Normally all my downloads are done through the "Internet Download Manager", which is a super awesome piece of software. I removed browser integration for Internet Explorer (You can do this in the options of IDM). Then I went to MSDN site via Internet Explorer and tried to download a software and it automatically redirected to FTM (File Transfer Manager).
And finally it got started to download. The transfer rate of download was jaw dropping (was maximum of the connection).
So if you were fed up with the slow transfer rate of MSDN download, I think this is the solution. One thing to note was when you directly download a software, you don't have pause/resume capability. But with FTM you have that. Also I download few big size software and none of them crashed during the download.
And one more thing. I tried this with Internet Explorer. So if any of you try with Firefox or Chrome, please drop me the results and the procedure you followed. I'll share it with the community.
Saturday, April 27, 2013
MyOwnSHell - C source
Hi guys,
When i was following the OS module at the university, I had to create a simple Shell Application. With the functionality to handle one pipe. So this is my code. Check it out. (It is a huge mess by the way)
Sunday, April 14, 2013
Uninstall Java completely - Ubuntu
Hi guys,
Sometimes you may have installed openjdk and you may to move to Oracle jdk. When you are, you will have to install oracle jdk and update the alternatives. But sometimes you will not be able to install it properly. So why you don't uninstall java completely and restart the installation process??
I also faced a similar scenario and wasn't be able to uninstall java totally. After quite googling I found an answer in Ubuntu community. Here it is.
Please note that this will uninstall everything related to java(Including Eclipse installations & etc)
If the command above produces any output like /path/to/jre1.6.0_34/bin/pack200 remove the directory that is parent of bin, like this:
Source :
Go to source link
Sometimes you may have installed openjdk and you may to move to Oracle jdk. When you are, you will have to install oracle jdk and update the alternatives. But sometimes you will not be able to install it properly. So why you don't uninstall java completely and restart the installation process??
I also faced a similar scenario and wasn't be able to uninstall java totally. After quite googling I found an answer in Ubuntu community. Here it is.
Please note that this will uninstall everything related to java(Including Eclipse installations & etc)
sudo apt-get update
apt-cache search java | awk '{print($1)}' | grep -E -e '^(ia32-)?(sun|oracle)-java' -e '^openjdk-' -e '^icedtea' -e '^(default|gcj)-j(re|dk)' -e '^gcj-(.*)-j(re|dk)' -e 'java-common' | xargs sudo apt-get -y remove
sudo apt-get -y autoremove
Purge config files:dpkg -l | grep ^rc | awk '{print($2)}' | xargs sudo apt-get -y purge
Remove Java config and cache directory:sudo bash -c 'ls -d /home/*/.java' | xargs sudo rm -rf
Remove manually installed JVMs:sudo rm -rf /usr/lib/jvm/*
Remove Java entries, if there is still any, from the alternatives:for g in ControlPanel java java_vm javaws jcontrol jexec keytool mozilla-javaplugin.so orbd pack200 policytool rmid rmiregistry servertool tnameserv unpack200 appletviewer apt extcheck HtmlConverter idlj jar jarsigner javac javadoc javah javap jconsole jdb jhat jinfo jmap jps jrunscript jsadebugd jstack jstat jstatd native2ascii rmic schemagen serialver wsgen wsimport xjc xulrunner-1.9-javaplugin.so; do sudo update-alternatives --remove-all $g; done
Search for possible remaining Java directories:sudo updatedb
sudo locate -b '\pack200'
If the command above produces any output like /path/to/jre1.6.0_34/bin/pack200 remove the directory that is parent of bin, like this:
sudo rm -rf /path/to/jre1.6.0_34
.Source :
Go to source link
Thursday, March 21, 2013
Installing SVN Server on VM Host (Ubuntu 12.04) - Part 1
In this tutorial I'll be describing how to install and configure SVN Server on Ubuntu virtual host. Except for few commands, most of this tutorial will be applicable to various Linux distributions.
Check list for this tutorial. :D :D
VMWare workstation (I use VMWare 9.0). You may wish to use VMWare player as it is free. Only difference you will feel is only one VM at a given time you can use if you use VM Ware player.
Ubuntu Linux ISO (I use 12.04 as it is the long term support available distribution)
Finally a internet connection.
First of all I will describe how to create a virtual host which runs ubuntu.
Open up VMWare.
Click File ==> New Virtual Machine
And then a window will popup.
Select Typical and press next
Select install from a disk. Press brows and select the Ubuntu installation ISO.
Then press next.
Provide the personalize information and press next.
Finally provide a name for the virtual machine and click next and then finish.
Now you have a virtual machine to host your VNC Server. But wait, we forgot to install the OS for the machine. Lets see how can we install the operating system to the virtual machine.
Select the virtual pc you create from the library (Located in the left hand side of the screen).
And then click "Power on the virtual machine" link.
Then the vm will load.
Then the installation window will popup. Select Install from that window
After that a window will popup.
Select "Something else" from that.
Create new partition table like above and press install now.
Then it will popup another window to provide some mandatory data. Fill them and wait till the OS get installed.
Good. Now you have a working virtual machine also.
Lets go and continue installing SVN Server on the virtual host.
First of all will create a Bridge network connection for our virtual machine.
Click "Edit Virtual machine Settings" and select network adapter. Select the network connection : Bridged.
Then open up the terminal.(Yeah now we are gonna install SVN Server.. finally..)
Type the following code and press enter
"sudo apt-get install subversion"
Finally we are done installing SVN Server to our vm host. To check the svn server type
"svn --version"
If you do exactly as the tutorial mentioned, a description like above will appear.
For now that's enough :D :D .
Let's see how to configure SVN Server from the next article.
Till then.....