Sunday, December 9, 2012

Develop Windows Phone Apps - Getting Familiar

Hey guys, just as I promised you earlier, here is the second part of the Windows Phone Apps Blog post series. So here it goes...

First get Visual Studio 2012 opened. Hope you have successfully installed both Visual Studio 2012 and WPSDK on your machines. So lets start working now. To open a Windows Phone App file, go to

File -> New-> Project

Then you will get a screen like follows.

New Project screen


Select Windows Phone in Templates, (where I have marked as number 1), then select Windows Phone App (number 2). Give a proper name (number 3) and hit OK button. (marked as number 4)

If you get a screen like follows, make sure you select 'Windows Phone OS 7.1' from the drop down list before hitting OK button.

OS Version


Now you have opened a new Windows Phone App file. Lets see what kind of files we are going to work with when we are developing a Windows Phone App first. If you take a look at the Solution Explorer, you will see that there are 3 png files and 2 xaml files.

Solution Explorer
Let me tell you about the jpg files first. 

ApplicationIcon - as the name implies it, it's going to be the Icon of our app. 
Background - You all know what this is. It's the background file of the MainPage.
SplashScreenImage - it's the image which will appear for a very short time before the app actually starts running.

(I will attach screen shots of a running app, for each of these png files , so you can understand where they fit in)


MainPage.xaml is the file we are going to work with now. And the MainPage.xaml.cs file inside it holds the code of the MainPage.xaml file.

We can use both of these files to edit our phone app page.

Lets create a simple app first..

Edit the PageTitle (number 2) and the ApplicationTitle (number 1) as you like. To do this you can either double click on the text block in MainPage.xaml file or edit Text under the TextBlock tags in MainPage.xaml.cs file.

MainPage.xaml

MainPage.xaml.cs

I changed the PageTitle to "Hello" and kept ApplicationTitle as it is.

Now we are going to add a Application Icon, Background and a Splash Screen Image to the app. To upload new files, right click on the project name under Solution Explorer. Then select 
Add -> Exsisting item.


Add exsiting item

Then you will get a file browser. There select the files you want and click Add button. Now you can see your images in the solution explorer. Delete the older jpg files and name the new ones to be exactly the same as the older ones. So again you will end up with 3 jpg files named

ApplicationIcon.jpg
SplashScreenImage.jpg
Background.jpg

Now we have finished creating the app. Now click on Emulator WVGA 512MB button right bellow the meu bar.

These are the screen shots I promised earlier..

Application Icon
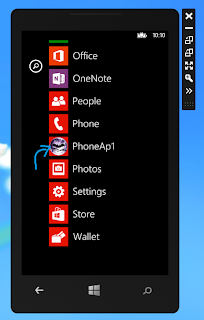
Application Icon


Splash Screen

Splash Screen


Your first Windows Mobile App sample is done now. Next time, I will tell you how to add an animation to your page. Till then, Take Care...

Monday, November 26, 2012

Develop Windows Mobile Apps with Windows 8 - Getting Started

If you have not still started using Windows 8, it's time for you to get windows 8 installed and start working with pretty colorful themes and apps.

Windows 8 Start Up Screen


 I shifted to Win 8 about a month back and I like it very much. If you are a Windows phone developer, I recommend you to use win 8 as the OS platform where you can install Visual Studio 2012 which has a very good emulator for windows mobile applications.

Once you have successfully installed Windows 8 in your machine, you have to instal Visual Studio 2012 and Windows Phone SDK 7.1 or Windows Phone SDK 8.
 

Visual Studio 2012 Start Up Screen

You can use the links below to download the above mentioned tools which are compulsory for Windows Phone Developing.


Visual Studio 2012 Express Edition for Windows 8 -
http://msdn.microsoft.com/en-us/windows/apps/br229516.aspx

Windows Phone SDK (you can either use Windows Phone SDK 7.1 or Windows Phone SDK 8)
http://dev.windowsphone.com/en-us/downloadsdk


Get these two installed and ready to use. A mobile app developer or a newbie, you are welcome to stay tuned with this series of articles which will cover everything you need to know in order to create a fully functioning, attractive, user friendly and your own unique mobile application.

Monday, October 8, 2012

Enable root mode in Fedora 17

Hi guys,

If you are using fedora 17 you must have noticed that it has disabled root access by default. If you want root access all you had to do was open up a shell and type su -root and change in to root mode. But There is a way (There should be for sure :D :D ) that u can enable root mode.


Lets see how you can aquire this.

Open up a shell and change into root

su -root

now cd into /etc/pam.d directory

cd /etc/pam.d

Now we are about to change a file. Ok what did you learnt when you were child about editing files??  Yeah you have to take a backup of that file in case you are screwed :P :P

Ok folks now we are going to edit gdm-password file.

cp gdm-password gdm-password.bak

Now open that file using a text editor such as vi. In my case I used nano as it is so simple.

nano gdm-password

Now find the line
auth        required      pam_succeed_if.so user != root quiet
and comment that line like thi,

##auth        required      pam_succeed_if.so user != root quiet

Now save and exit from text editor...

Ok pal. Now it is all over. U won the battle and now you have control over root account. Feel free to login as root in your next boot... :D :D


Saturday, October 6, 2012

Dell Inspiron N5110 Wireless setup under Linux ( Tested on CentOs 6.3)

Ubuntu normally comes with lot of drivers installed. So no one will have to install drivers manually for their home usage. But when it comes to Fedora, CentOs, RedHat, Debian etc etc wireless wont be pre installed. You will have to download Linux drivers manually and configure the system to use it. Method described under this post will work for most of Broadcom wireless devices under many Linux versions. OK Let's get started.

This post will cover the Driver installation of DELL Inspiron n5110 Laptop under CentOs 6.3 .

First download Linux driver from Brodcom.

http://www.broadcom.com/docs/linux_sta/hybrid-portsrc_x86_64-v5_100_82_112.tar.gz

Then download and install kernel-devel package and gcc.

yum install kernel-devel gcc

Now in shell go to the hybrid-postsrc_x86_64-v5_100_82_112.tar.gz

then unzip the tar file.

tar xzf hybrid-postsrc_x86_64-v5_100_82_112.tar.gz

After that go to hybrid-postsrc_x86_64-v5_100_82_112 directory.

Now build the driver as a Linux Loadable kernel module

make clean
make

if any error occured, try

make API=WEXT
or
make API=CFG80211

Then it will create some files including wl.ko

Now it is time to load the driver

to do that,

modprobe lib80211
insmod wl.ko

Let the system scan wireless device.
This will load the driver for current session.If you want to load the driver in bootup follow the instructions given below.

cp wl.ko /lib/modules/`uname -r`/kernel/drivers/net/wireless 


Now you'r Drivers should work properly.

Monday, October 1, 2012

How to mount NTFS in CentOs

By default CentOs does not support NTFS partitions. That is a huge pain because if you have iso and lot of stuff inside your NTFS partition and you won't be able to use it.

Installing some tools would do the trick for you.

Step 1
-----------

Installing  rpmforge  repository.

If you already have installed this repository you can skip this step.

If the rpmforge repo is disabled by default, insert following code
yum --enablerepo=rpmforge install fuse fuse-ntfs-3g 


Download Appropriate package

 Open new terminal window and log as root

then insert following code to install GPG key

rpm --import http://apt.sw.be/RPM-GPG-KEY.dag.txt
 
If an error occurred like following, that means it has already completed.

Change directory to downloaded path.

Install package using

rpm -i rpmforge-release-0.5.2-2.el6.rf.*.rpm


Step 2
-----------


Now install following packages.


yum install fuse fuse-ntfs-3g

You may also need following packages,

yum install ntfs-3g 
yum install ntfsprogs ntfsprogs-gnomevfs  

If you cannot install them that means EEPL repo has been disabled.To enable that repository enter following code.

yum --enablerepo epel install ntfs-3g 

Now you can browse your NTFS partition using file browser. But if you want to mount a partition into a folder you can follow given instructions.

Step 3 (Mounting NTFS Partition)
---------------------------------------------------------------------
Lets say your ntfs partition is /dev/sda3
Create a mount point

Ex: /my/hdd

Then edit /etc/fstab

add following line to fstab

#To read only access
/dev/sda3       /my/hdd  ntfs-3g  ro,umask=0222,defaults 0 0 
 
#To read and write access
/dev/sda3       /my/hdd   ntfs-3g  rw,umask=0000,defaults 0 0 

Save the file.


Now mount the file system.


mount /mymnt/win 

Ok you are done now. :D :D


Monday, September 24, 2012

Enable Gnome 'root' Account in Debian Linux

Ok guys,

In any OS there are user management system installed. And by default ur user account has administrator privilages (Yeah you are the MAN). If you are a Windows user have you experience that somtimes when you are executing some programs it pops up a message saying that the program require administrator privilages, Or if you are a linux guy when you try to access some sort of application have you provided root account password? But if you have administrator rights and why still these OS asks for passwords and all??

Answer is that both windows and linux disable the administrator/root account.

Ok now lets get into the topic. Lets say that you want to enable root/administrator account and be the 'REAL' man... following steps explains how you can be the real man in Debian Linux. In a later post I'll add how you can enable root access in Ubuntu, CentOs and how you can enable Administrator account in windows...


Step one :

Log in to your user account.

Step two :

Open up terminal. ( Applications --> Accessories --> Terminal )
type in following shell commands

su root   //( it will ask you for the root password. This is setup at the installation of debian )
gedit      //This will open graphical text editor which we will use to edit some configurations.


Step three :

Open  up the file /etc/pam.d/gdm3

Then comment the fifth line. It will look like following after comment.

#auth   required        pam_succeed_if.so user != root quiet_success

Now save the file

Then enter following shell command

reboot


Congratulations!!!

You have successfully enabled the root account ......

Thursday, September 6, 2012

Installing JMeter on CentOs(Will work on most Linux versions)

Hello guys.

Today I'm going to describe how you can successfully install Apache JMeter on your Linux system.

Before install make sure you have installed Java 1.5 or newer version in your System.

Then you will need to download Apache JMeter.
http://jmeter.apache.org/download_jmeter.cgi

Download the zip file of the jmeter. (In my case I will be downloading apache-jmeter-2.7.zip)

Now open the terminal and follow given instructions.

type 'su' (without quoats. This will change your user mood into root)
Provide the root password.

Ok now you are the man..
Can you remember where you saved apache-jmeter-2.7.zip
 If you don't make sure to check where you saved that file.

now type following code

cd /var/www/html

Now you have to copy apache-jmeter-2.7.zip to this directory.For that you need to know where you saved the zip file.

cp PATHOFZIPFILE ./
(in my case I did like

cp /home/djclans/Downloads/apache-jmeter-2.7.zip ./

Note :In terminal, codes are case sensitive. And there is a space between .....jmeter-2.7.zip and ./)

Next you have to unzip the archive. In order to do that you need unzip installed in your system. If you don't just type yum install unzip and it will be installed.

To unzip the archive,

unzip apache-jmeter-2.7.zip

After completing the unzip process go inside that folder and you will find bin
folder. Go inside that too.

cd apache-jmeter-2.7/bin

Now everything is ready........

Ok now lets fire it up...

sh jmeter

few seconds later GUI will pop up.

And now we are done..

See you later guys.....

Friday, August 31, 2012

Hello World

class TestedAndWrote{
     public static void main(String[] args){
           System.out.println("Hello World");
     }
}


Hello people...


It is a great day for this nation...to the whole world...

wait. enough with that presidential talk :D :D....

So guys what I am trying to do here is post stuff which I tested(Yeah some stuff made me reformat windows several times) and found working. So lets get to business..

Ah before that, if you also found something interesting and feel like sharing with the world(or at least with the people who read this blog) feel free to inbox me and I will publish it for you.


See you soon with my first post(Yeah it will be a techie article)..

:) :) :) :) :) :) :D :) :) :) :) :) :)